Total Pageviews

Sunday 7 April 2013

WEAPON MODELLING: SHOTGUN DEVELOPMENT AND COMPLETE

      Somehow I've managed to overcome a thousand different crippling issues with my Shotgun Model. Even after begin told to start a new model half way through the assignment, I managed to get this done - it's a miracle!

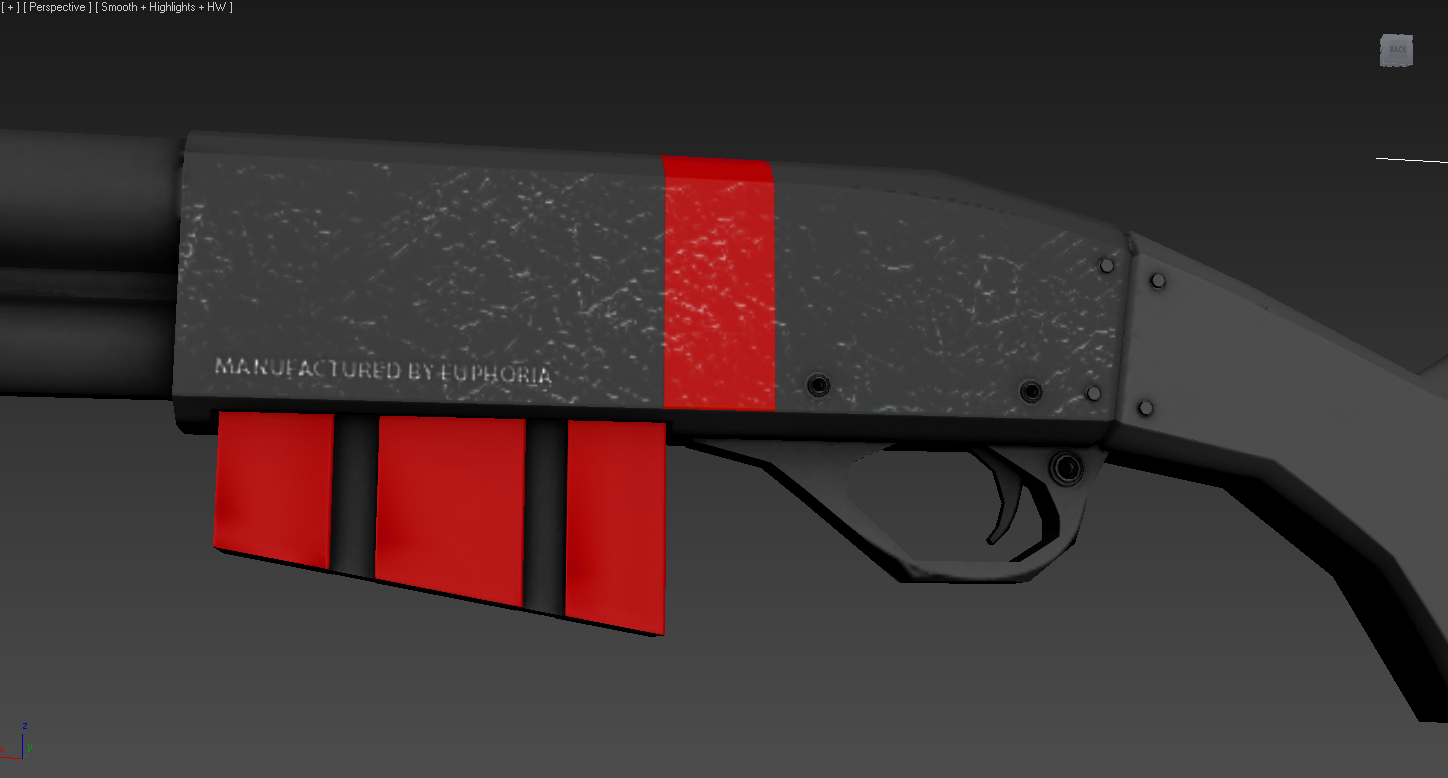
   To be honest, I love the design and final result, but there are clearly a few flaws in it. What I will say though, is that these flaws could of been fixed if I had the time. I had issues with the Diffuse Map (not showing true colors), the Specular Map (not reflecting light correctly) and baking (low poly / high poly translation issues). Even so, I think the final shotgun turned out as well as it could of done given the time I had and the issues I overcome and still need to overcome.

   For my final hand-in of the year, I shall (along with all the previous sheets) these three presentation sheets showing the development of the shotgun model and it's final result.


COMMENTS AND CRITICISMS APPRECIATED!

WEAPON MODELLING: FINAL MODEL
by Christian Whelan
WEAPON MODELLING: SHOTGUN DEVELOPMENT
by Christian Whelan
WEAPON MODELLING: SHOTGUN BAKED TURN-AROUND
by Christian Whelan
WEAPON MODELLING: FINAL MODEL AND MAPS TURN-AROUND
by Christian Whelan
  
     From my last post on the shotgun model and it's Specular Map, I think the final model has decreased in quality. I think this is largely due to my issues with the Specular Maps and Diffuse Map. I wish I could of fixed it but hopefully this will do (for now).

  Actually, just this second, I've realized I've been an idiot. My diffuse texture is higher than the 1024x1024 limit out tutor has set. I guess that and the final presentation sheet will have to be changed! Brilliant...

NOTE: THE FINAL PRESENTATION SHEET ON THIS POST IS THE FINAL ONE NOW

NEXT POST: WEAPON MODELLING: MARMOSET RENDERING

WEAPON MODELLING: ASSAULT RIFLE DEVELOPMENT AND BAKED

     Coming up to the deadline for the last assignment of the year now - research, design, develop  texture and present a first person shooter gun in 3Ds Max.

   I started this assignment a month and a half ago with a weapon I researched, designed and modeled thoroughly. Unfortunately, this weapon was not up to the standard it should of been, or at least the issues found in the weapon would render any further progress below standard - I had to start again. My tutor did say however, that I could finish this weapon whilst starting a new one. Due to other course commitments, I haven't managed to finish the Assault Rifle, however, this is not to say I won't over summer.

   It seemed a waste to just drop the weapon to the side and continue on with a new weapon, so I decided to include the Assault Rifle (unfinished) in the final hand-in. This Assault Rifle, which I developed until baking the Normal Map, is below in two presentation sheets.


WEAPON MODELLING - ASSAULT RIFLE DEVELOPMENT
by Christian Whelan
WEAPON MODELLING - ASSAULT RIFLE TURN-AROUND
by Christian Whelan

      The presentation sheets really say all I need to say, so overall, I was and am really happy with how it turned out. Yes, it has topology issues, yes it has smoothing issues and yes, the symmetry screwed up the barrels and the side specific features. But regardless of this, I think considering it was my first attempt at modelling anything even remotely complex, it turned out great. It' s a complex weapon, and I think considering the ambition I put into this design, I pulled it off pretty nicely.

Can't wait to texture this!

NEXT POST: WEAPON MODELLING: SHOTGUN DEVELOPMENT AND COMPLETE

Friday 5 April 2013

WEAPON MODELLING: SPECULAR MAP (COMPLETE)

       Didn't take me as long as I thought it would, but I finished my Specular Map and I think it's looking pretty good. I could of just put one single texture over all of the UV Islands, and I did initially (in a rush), but it just looked crap. The texture was larger in some areas, but smaller in others, and it just made it look cheap - plus, it's lazy. 

So I decided to take it home and battle against my terrible computer to refine it, adding in highlights where I thought necessary etc but the one thing I'm really pleased with, is the etched writing and logo in the weapon, I think that takes the ordinary shotgun and makes it a little more interesting. Have a look!


WEAPON MODELLING - SHOTGUN MODEL (IN PROGRESS)
by Christian Whelan
WEAPON MODELLING - SPECULAR DETAILS
by Christian Whelan
WEAPON MODELLING _ SPECULAR MAP
by Christian Whelan

     I used a different texture for the pump, and a different texture of the stock, because like I said, one texture just didn't make sense, this is a weapon of multiple parts after all.

        So, now all that left to do is actually paint it. To be honest, I don't think that is going to take very long, because as it stands, the test Diffuse Map I have on the weapon at the moment is pretty close to what I want, so all I'm going to do, is transfer the scratches of the Specular over to the Diffuse, lower the opacity, and then finally  add some texturing to the red paint (scratches etc). Once that's done, the weapon is done, even if there won't be much difference between the Specular and Diffuse - I'm not going to paint it green for the sake of it.


NEXT POST: WEAPON MODELLING: ASSAULT RIFLE DEVELOPMENT AND BAKED

WEAPON MODELLING: SPECULAR AND DIFFUSE MAP (IN PROGRESS)

        Ok, for some annoying reason, the blog posts I'd done today (3 of them) haven't posted or saved, so I have to start again... brilliant.

    After an attempt at baking the Normal, Complete, Specular and Diffuse map. I started again and refined the Normal and Complete Map bake. From there, I've now began to add the details into the Specular Map. I really want this to look good, so attention to detail is my goal for the rest of the day. Once that's done, the Texture will be more effective - it's a knock on effect.

    Anyway, I've done the majority of the weapon, adding in the highlights using white brushes, Photoshop Effects and Ndo as I go along to refine the lighting information in-engine (Xoliul Shader 2). Have a look!


WEAPON MODELLING - SPECULAR MAP IN PROGRESS
by Christian Whelan
WEAPON MODELLING - SPECULAR MAP IN PROGRESS
by Christian Whelan
WEAPON MODELLING - SPECULAR MAP IN PROGRESS
by Christian Whelan

NOTE: The last two screenshots are less developed than the first
 screenshot - I added in bolder scratches along the edges of the weapon.

WEAPON MODELLING - SPECULAR MAP - IN PROGRESS
by Christian Whelan

 As it stands, I'm more than pleased with the results, the problem is now, I have to complete the rest of the weapon on my home computer.... the one that struggles to run solitaire. So it's going to be a battle between man and machine for the weekend.

In addition, as I apply the maps one by one, it looks like the Specular Map is dulling the Normal map ever so slightly. It's fine, but when the lighting isn't hitting the Specular Map properly, it looks bland. Maybe I'll overlay the Normal Map onto the Specular to regain that information, then desaturate and invert it, that might do the trick!

NEXT POST: WEAPON MODELLING: SPECULAR MAP BAKED


WEAPON MODELLING: COMPLETE MAP AND NORMAL MAP (BAKED)

    After my initial attempt at baking the maps onto the shotgun, I started against in an attempt to do it 'properly'. So far, I've only baked the Normal Map and the Complete Map, but already, it's looking much, much, much better. Thank god! Have a look below.

WEAPON MODELLING - NORMAL AND COMPLETE MAP
By Christian WHelan


Now I just need to sort out the Specular to I can get painting the shotgun.

NEXT POST: WEAPON MODELLING: SPECULAR AND DIFFUSE MAP (IN PROGRESS)

WEAPON MODELLING: SPECULAR TEST (ISSUES)


     Somehow, I've made some progress with the Specular Map. The hardest part is getting my head around which map goes where. I've just this second, had a brainwave when looking at google for some desperate inspiration. Before this brainwave, I had a midly succesfull attempt at using the Specular, Diffuse and Normal Map together. This is below;
 
Note: This attempt does not include the Complete Map.
 
WEAPON MODELLING: SPECULAR TEST
by Christian Whelan
 
To get my head around the different maps and their use in 3Ds Max, I used this google image showing each of the different maps - it's really helpful. Thank god I found it!
 
DIFFERENT MAPS EXAMPLE
LINK 
 
So now all I need to do, is get each map into Photoshop and saved seperatley, then paint the texture and add the Complete Map to the Diffuse. Hopefully, by the end of today, I should have everything done besides the Diffuse Map (I'll paint that another day).
 
NEXT POST: WEAPON MODELLING: COMPLETE MAP AND NORMAL MAP (BAKED)
 

Thursday 4 April 2013

WEAPON MODELLING: ASSAULT RIFLE BAKED (NORMAL MAP)

     I've not touched this weapon in a few weeks now, and now I've gone back to it, I'm absolutley gutted that I couldn't finish it. Not that I don't like my shotgun, it's just that I think this looks better overall, even with the inconsitencies and dodgy baking - it's just a better weapon. I spent hours on this best and it's cool as hell!

Anyway, before I was told to start again (which was fair), I baked the high poly Normal Map onto the low poly and came out with a pretty snazzy looking weapon.

WEAPON MODELLING - REFERENCE CONCEPT
by Christian WHelan
WEAPO MODELLING - ASSAULT RIFLE BAKED
by Christian Whelan
WEAPON MODELLING - ASSAULT RIFLE BAKE TURN AROUND
by Christian Whelan
WEAPON MODELLING - ASSAULT RIFLE NORMAL MAP
by Christian Whelan
 
     There are serious issues with this weapon on all sides to be honest. The gun's barrels are way to thin, mainly because my use of symmetry was terrible, and the trigger, the grip and stock havn't smoothed properly, leaving a choppy looking weapon. Regardless though, I still think it's a good attempt considering it's was my first attempt at modelling anything remotely complex (the Old West Cart was terrible looking back at it).

NEXT POST: WEAPON MODELLING: SPECULAR TEST (ISSUES)

WEAPON MODELLING: SHOTGUN BAKED (NORMAL AND COMPLETE MAP)

      I overcame way to many issues to talk about here, to get this weapon baked. I spent at least 3 hours figuring out why the hell the shotgun wouldnt bake the normal texture. As it turns out, Nitrous was enabled... again! Sick of that thing. Anyway, the weapon is finally baked and ready to be painted and textured.
 
I used the Xoliul Shader to get this done for three reason - it's intuitive, it more effective and finally, I need a 'free' engine to shade the weapon for when I present the final model. Xoliul lets me do that (forget paying for Marmoset! I havent enough money as it is!).
 
WEAPON MODELLING - SHOTGUN BAKED
by Christian Whelan
WAEPOON MODELLING - NORMAL MAP
by Christian Whelan
WEAPON MODELLING - COMPLETE MAP
by Christian Whelan
    
      As I type, I'm attempting to develop a specular map - maybe I have to paint it first? I don't know, but if that's the case, I'll have to wait to get home where I stupidly left my digital pad. So far though, even though there are a couple of unfixable missing rays, the shotgun it turning out "Really smart" as my tutor puts it! So far so good!
 
NEXT POST: WEAPON MODELLING: ASSAULT RIFLE BAKED (NORMAL MAP)

WEAPON MODELLING: MAPPED MODEL / UV MAP

     My computer seems to be dying a slow death, but as it hangs onto it's life, I managed to get the low polygon shotgun model mapped, and exported the UV. I 'thought' I ran into a massive issue, but thankfully, it was just my stupidity - I still had the subdivision tools selected and the Nitrous driver was causing some graphical problems...

Anyhow, with a little help from the lifesaver that is Textools, I've produced a pretty good UV Map - it's organised, as efficient as it can be, and hopefully, once its baked, it will be as effective as I hope it will be. Although, I think that in some areas, the difference in topology between the Low Poly and High Poly models will become detrimental to the quality of the overall bake. I hope not, otherwise I'd have to UV Map the entire thing again...

WEAPON MODELLING - SHOTGUN UV MAPPED
by Christian Whelan
WEAPON MODELLING - UV MAP
by Christian Whelan
 
This UV Map will come in handy when it comes to painting the shotgun's texture.

NEXT POST: WEAPON MODELLING - SHOTGUN BAKED (NORMAL AND COMPLETE MAP)

Monday 25 March 2013

WEAPON MODELLING: SHOTGUN HIGH / LOW POLY

      3 hours from start to finish, I've managed to develop a shotgun using two references two create a more unique weapon , rather than a bog standard shotgun. Personally, I absolutely love the results. Don't get me wrong, there were a few issues along the way, and it was a slog adding in all the supporting geometry. But in the end, even though there is still one graphical inconsistency (the bottom barrel thingy...), it doesn't matter, because it's only a minor detail. Thank god the hard part is over. Have a look at both versions below!

Oh, I haven't made the .GIF files yet, but I'm sure they'll screw up like they usually do...


COMMENTS AND CRITICISMS APPRECIATED!

WEAPON MODELLING - LOW POLY SHOTGUN
by Christian Whelan
WEAPON MODELLING - HIGH POLY SHOTGUN
by Christian Whelan
WEAPON MODELLING - COMPARISON .GIF
by Christian Whelan
WEAPON MODELLING - DETAILS COMPARISON
by Christian Whelan

       Ok, so maybe the .GIF images didn't screw up (makes a change). As you can probably tell, the majority of the turbo smoothing just gives the shotgun those nice lines and curves, but when the supporting topology is most present (the pump, the barrel and the trigger), you can really see the difference, and if successful, it will show when I bake the normal map to the low poly model.

     So that's it, it done. This time, I've made show there are no inconsistencies, and that I added in all the side specific details 'after' I added the symmetry modifier. The result, hopefully, is a model that will look good at all future stages, leaving me with a nicely modelled, mapped and textured weapon. 

It's a shame I didn't pay this must attention to detail on my first model!

NEXT POST: WEAPON MODELLING - MAPPED MODEL / UV MAP

Sunday 24 March 2013

WEAPON MODELLING - MODELLING A NEW WEAPON

I have to start a new model, UV Map it, and bake it from scratch. Here's why.

       As much as I hated the idea, I 'have' to start a new model for the assignment. It's not just the fact that I had spent hours researching, designing and developing the model, it's that I actually loved my design - I was over the moon with my model. Unfortunately, after UV Mapping and baking it, I took it into university to receive some tutor feedback. If you look below, you can see that the weapon's stock doesn't smooth out as well as my tutor wants (I agree with him), additionally, being the stupid guy I am, I forgot to use symmetry early in the development  The smoothing issue was both mine an his fault, but the symmetry predicament is all down to me. 

WEAPON MODELLING - SMOOTHING ISSUES
by Christian Whelan
   
  I could continue with this weapon, texture it, add a specular map and present it, but these two issues will effect consistency in design, and the quality of the texture and specular map. So, rather than present a ugly looking model at the end (even though I spent a long time on it), my tutor feels its better for me to start a new and simpler model to continue the assignment - he advised I model a basic shotgun.

     The silver lining in this is that all the hardest parts are over, and my tutor likes the result. So he accepted my assault rifle model for this submission and is allowing my to continue on with a simple shotgun as if nothing happened. Which will one, turn out looking better and two, be easier to texture and present. 

     Not all is lost though, he says I can continue developing the assault rifle simultaneously if I feel strongly about it, and I will. By doing that, I'll have two weapons to hand in for the assignment, not just one. It's a win/win scenario on the most part. 

I'll start modelling the shotgun now.

NEXT POST: WEAPON MODELLING - SHOTGUN LOW / HIGH POLY

WEAPON MODELLING: NORMAL MAP

    After UV Mapping the model using Textools (an invaluable time saver - download link below), the model was ready for the next stage of development - baking using projections, a little tool called , to create normal maps.

TEXTOOLS - DOWNLOAD

    I started by ensuring that all the sections where attached and that the UV Map was efficiently spaced. From that point, I ensured that both the high poly and low poly model where positioned identically on the X, Y and Z axis so that eventually, the projection would be as accurate as possible. From this point. I named the models (to avoid confusion) and applied the projection modifier, edited the projection cage, modified the render to texture settings and saved the Normal Map (for baking). This is below.

    Before going ahead with the bake, I decided to do a little test render first, to ensure that the change wasn't causing any issues. As it turned out, it was, and by rendering the map at a low resolution, I had saved myself some time and hassle. With a little modification  of the push property, my Normal Map was fine when rendered at a higher quality (1024 x 1024). So, now I had my Normal Map to be baked onto the model (see below)


WEAPON MODELLING - NORMAL MAP
by Christian Whelan

NEXT POST: WEAPON MODELLING - MODELLING A NEW WEAPON

Sunday 17 March 2013

WEAPON MODELLING: WEAPON UV MAPPED

     Managed to get the issues fixed. Turned out it wasn't an issue, it was just me being an idiot. I hadn't ironed out the faces, hence the weird UV Mapping issues and absent checker textures. Anyway, I got it done, and hopefully there are no issues (no doubt there will be many). Now all I need to do is is bake the normal map onto the low poly. 

I had some issues with distortion and I ran into some issues with my topology, but I eventually got it done. Have a look below. I think it's looking okay.


WEAPON MODELLING - LOW POLY UV MAPPED
By Christian Whelan
WEAPON MODELLING - COMPARISON
by Christian Whelan

   To be honest, my weapon is so rigid that I don't really think the UV map will do that much visually. I suppose I'll just have to wait and see - I'm going to get the baking done now. Good job I wrote a blog on how to do it!

NEXT POST: WEAPON MODELLING - NORMAL MAP AND COMPLETE MAP

Saturday 16 March 2013

WEAPON MODELLING - TEXTOOL UV MAPPING ISSUES

      So I installed Textools into 3Ds Max and intended to get the UV Mapping and normal map baked within an hour. Unfortunately the issue with my disappearing faces that I thought I'd fixed previously, decided to make a surprise entrance again. I seriously have no idea what to do this time. 

When I apply the checker texture and edit the UV Map (using Textools), the object reverts to a dark grey colour and disappear on the UV Map (as you can see below)

WEAPON MODELLING - UV MAPPING ISSUES
WEAPON MAPPING - UV MAP ISSUES

I've tried this on several objects.The primitive shapes that make up parts of the weapon are fine, it's just the polygons I'd drawn in myself that are having the problems (the ones that make up 90% of the weapon). If someone could help me with this I'd greatly appreciate it.

I'll browse forums in blind hope for now. Hopefully, I'll get this problem fixed by Monday.

NEXT POST: COMING SOON!

WEAPON MODELLING: LOW POLY MODEL

          I overcome the hurdle I had yesterday. As it turns out, all I had to do was save the model as a 3Ds Max 2012 format. Unfortunately  that meant I needed the 2013 version only available in University for some strange reason.   

    Anyhow, after finishing the development of the high polygon model and tidying up its topology. I needed to take the high poly model, and remove the majority of its supporting topology to create the low polygon model. The reason for this is because the next stage of development is the UV Mapping and baking.

    Eventually I'll do this by projecting the maps of the high polygon model onto the low polygon model, to give the illusion that the low polygon model is in fact the highly detailed high polygon model. This is why I need both versions - to help with mapping, texturing and rendering.

    Now the cleaning of the topology was done, I deleted the supporting topology, ensuring that no vertices or edges crucial to the weapons base shape were removed. What was left (as shown below) is a weapon model with less tris and less detail, but a weapon that would run faster in an engine, saving processing space for more details in-game. The final Low Poly model is below.


ORIGINAL DESIGN - REFERENCE
by Christian Whelan
WEAPON MODELLING - LOW POLY
by Christian Whelan

All I need to do now is bake the high poly model to the low poly model. Then I can paint the texture and add the diffuse and specular maps.

NEXT POST: WEAPON MODELLING - TEXTOOL UV MAPPING ISSUES

WEAPON MODEL - ISSUES WITH 3DS MAX 2013

Unfortunately, I've ran into a speed bump with my model development. 

      At home, I use the 2012 version of 3Ds Max. At university, I use the 2013 version. The reason for this is because for some strange reason (especially now) 2013 will not install on my computer. It says it is already installed, even though it isn't anywhere to be found on my computer. The issue here, is that the model was last developed in university on the 2013 version of 3Ds Max, therefore  it is not compatible with the 2012 version.


     The only way I can use the model in the 2012 version of 3Ds Max is to convert the model into an OBJ file using the 2013 version. Obviously I don't and cannot have that. 


Development wont be possible until either Friday the 15th or Saturday the 14th. I'd have to get UV mapped in that day to hit the milestone hand-in on time.


NEXT POST: WEAPON MODELLING: LOW POLY MODEL


WEAPON MODELLING: MODEL PROGRESS 09/03/2013

         I took my seemingly finished high poly model to university for my tutor and it turned out that although it was a nice design, it's topology was a mess (as I suspected). A golden rule is to never have five sided polygons on your objects - it's a nightmare when it comes to smoothing, mapping and rendering. Stupidly, because I am forgetful, I thought five sided polygons where defined by there actual distinctive sides.... I was wrong. It turns out polygons are determined by their vertices. When this fact was realised, it turned out my weapon was made out of five sides polygons (oops...). To be honest, I thought it was hilarious haha Then I realised I had to spend the next three hours fixing the damn thing! 

Anyway I got it done and the slightly noticeable result is below.

WEAPON MODEL - HIGH POLY COMPLETE
by Christian Whelan

Now the model is done, it's time for the next stage - mapping, texturing and baking. My favourite part...

NEXT POST: WEAPON MODEL - ISSUES WITH 3DS MAX 2013

Sunday 3 March 2013

WEAPON MODELLING: MODEL PROGRESS 01/03/2013

         Well yesterday was my 21st birthday, so I didn't really make any progress on my model, thankfully I'd already made some good progress on it the night before. Anyway, the fun is over now, so I sat at my laptop for a good hour adding in the supporting geometry until my laptop decided to commit suicide and corrupt the single and only version of the model... brilliant - two weeks of work gone.

   By some miracle of good luck, it turns out 3Ds Max 2012 has a Auto Back-Up feature. So just when all seemed lost, I managed to open to most recent backup found and re save my file 4 times in 4 separate places. It's set me back a good couple of hours but at least not all was lost. I won't be making that mistake again.

     Anyhow, I made a clone of the gun, added in the supporting geometry (not an easy task when you have an object full of hidden tris and 3 sides faces) and applied the turbo smooth to each of the sections. However it turned out I forgot to add in two huge details - the pull back bullet gun thing (on the side) on the rivets that give the gun some depth.

It turned out great I think! Have a look.


COMMENTS AND CRITICISMS APPRECIATED!

|WEAPON MODELLING - ORIGINAL CONCEPT
by Christian Whelan
WEAPON MODELLING - MODEL TURN-AROUND (HIGH POLY)
by Christian Whelan

    It didn't come without a few issues. The more complex sections of the weapon were a real struggle when it came to adding in loops and cuts. In fact, I'm still unsure whether or not my topology is at a high standard. It seems messy in some parts, or maybe that's just me. After all, I've been staring at it for a good few hours now. 

Anyhow, I added in all detail that give the weapon it's 'character' and depth. The GIF below shows these and when I finally polished out the imperfections (which I'll be made aware of on Monday) I'll be able to map and texture it. Can't wait...


WEAPON MODELLING - MODEL DETAILS
by Christian Whelan

NEXT POST: WEAPON MODELLING: MODEL PROGRESS 09/03/2013

Saturday 2 March 2013

WEAPON MODELLING: MODEL PROGRESS 27/02/2013

        So I finally got the basic low poly model completed. There are a few details here and there that I still need to polish out, but so far, I'm fairly happy with the results. The parts that need polishing? The grip is bothering me a bit, (I cant put my finger on it) and the barrel area of the gun isn't connected and has confusing topology.

     Of course, I've only modelled half of the weapon - the aim is to UV Map one side and mirror it . The issue is, on the multiple occasions I've done this, the edges just don't match up no matter what I try. Because of this, light bleeds through the gap or clipping occurs, leaving in it's place an ugly render. This will only look worse when I UV Map it, so I need to sort this out pronto.

WEAPON MODELLING: ORIGINAL CONCEPT
by Christian WHelan
WEAPON MODELLING: LOW POLY TURN AROUND - IN PROGRESS
by Christian Whelan

So, all I need to do now is polish it up, add in any more detail I think it could use and then finally, add in the supporting geometry so I can Turbo-smooth like a madman, leaving a sexy weapon in it's place!

NEXT POST: WEAPON MODELLING: MODEL PROGRESS 01/03/2013

Tuesday 26 February 2013

WEAPON MODELLING: MODEL PROGRESS 26/02/2013

      I racked my brains to understand why exactly the rendering and Graphite Modelling Tools had a grudge against me causing those crippling issues. Eventually, I figured it out... hopefully.

      The clear problem, was that only one side of the face was editable and rendering without applying a two faced material. So I had a look around the modifiers and found the Normals modifier. I applied it and checked the "Flip Normals" and "Unify Normals" and collapsed the modifiers. Instantly, the colour issues were gone and the Graphite Modelling Tools actually had worked. Thank god! It took me half a day but I got there. Unfortunately, my goal to get this model done within two days has well and truly gone down the drain, made it's way to the Atlantic, sunk to the abyss and been violently murdered by a shark. Brilliant...

    Anyway, the progress is below. I altered the shoulder rest to fit with the original concept (it was too straight) and added in the middle layer of the barrel and body of the gun (the same object). 

Note: I did save the model with these modifications as a separate copy... I don't want to shoot myself in the foot.

COMMENTS AND CRITICISMS APPRECIATED!

WEAPON MODELLING - ORIGINAL CONCEPT
by Christian Whelan
WEAPON MODELLING - MODEL PROGRESS
by Christian Whelan

      Besides the trigger, grip and clip, the model hasn't much detail. This is completely down to the issues I faced preventing me from adding the detail you can see in the original concept. It's looking pretty faithful at the moment. From here, I'll add in the ribs into the shoulder rest grip and the detail into the stock (which will be fun...).

NEXT POST: WEAPON MODELLING: WEAPON PROGRESS 27/02/2013

WEAPON MODELLING: ISSUES WITH DEVELOPMENT

        I've been cracking on with the weapon model as I said I would, but the rendering issue I had with the disappearing faces has began to latch itself onto every object I create. Initially, I thought I had fixed the problem by applying a material that projects both sides of the faces. Although this did solve the rendering problems, the objects still adopt a different colour. The main concern however, is that the Graphite Modelling Tools no longer work on these objects, regardless of whether the material has been applied.

    I have absolutely no idea why this is. I've looked online for solutions and attempted them all, but none seem to work. This wouldn't be so bad if the weapon I had designed hadn't been so complicated. Sections such as the stock, the shoulder grip and many more to be developed require these tools. You can see what I mean when I compare the design and the in-progress model.

WEAPON MODELLING: WEAPON CONCEPT
by Christian Whelan
WEAPON MODELLING - MODEL PROBLEMS
  
     It looks like in-engine lighting, but it's actually the sections that have a different colour. The grip, the trigger, the stock and the shoulder grip all share the same problem, and considering these are the defining parts of the weapon, I find myself at a stalemate. I'd carry on developing the other section if I didn't think it might pose some issues when it came to baking and rendering.

If anyone has had the same issue and could help I'd be grateful.

NEXT POST: WEAPON MODELLING: MODEL PROGRESS 26/02/2013

WEAPON MODELLING: MODEL PROGRESS 25/02/2013

      The progress I had made on the weapon model turned out to be nothing more than practice when I went into University to find the file was glitch ridden. Two and a half hours later, and even an attempt at fixing the file by my tutor, I finally found the problem - a random piece of topology far in the infinity space. 

With no development progress today, I've set myself the task of getting the model finished within the next two days. However, I neglected to remember that my home copy of 3Ds Max was the 2012 version, not the 2013 version. So, the little glitch ridden progress that was made, was incompatible - I had to start a fresh. My progress is below.

COMMENTS AND CRITICISMS APPRECIATED!

WEAPON MODEL - REFERENCE IMAGE
by Christian Whelan
WEAPON MODEL - PROGRESS
by Christian Whelan
WEAPON MODEL - PROGRESS
by Christian Whelan

      It's turning out really well so far, but there are a couple of things troubling me. Firstly, the largest section of the grip is a darker colour than the rest, regardless of the objects properties. In an attempt to see if it was a refresh problem, I rendered it, highlighting a problem I am dumbfounded by - the main faces of both the grip and the trigger seem to disappear entirely. I hope to god I don't have to do them again!

WEAPON MODEL - RENDER GLITCH

    My second issue is figuring out how to model the individual insets where the rivets or screws would lie. It's an important detail that would stop the weapon looking plain and would enhance the normal and diffuse maps effectiveness  If I can't do it (which I'm sure there's a way to) then maybe I could use specular maps later in development to create the illusion?

I guess I just need to plod on developing this weapon, I'll fix it these two issues later, it's not that hard to model when using the create tool in co-operation with the in-environment reference image.

NEXT POST: WEAPON MODELLING: ISSUES WITH DEVELOPMENT